Arty-Forty

Saturday 11 February 2017

February video - Pockets and pop-ups.

Ok - apologies for the long title but today's video is part one of some techniques for making pages in a chunky mini book. This mini-book is full of interesting pages with pockets and pop-ups which are straightforward to make and really effective. The book itself is made using black card and then decorated using the Nature Sketchbook papers from Graphic 45. Of course you can use these techniques to make a book using any papers. The book construction is a concertina spine - but more of that in a later video - first a couple of pages. Today we are going to look at making a page which opens 'gatefold' style but has a card and pocket mechanism for keeping it closed - I call it a 'locking' pocket (though it's not really locked!). I also included on the video the 'how to' for a pop-up 3D page.

The first couple of pages look like this...


The video is below... but I am having trouble getting it to work with Blogger - so you may have to go to my YouTube channel  here.


I'll have more pop-ups and pockets featuring in next month's video - plus how to make the book - stay tuned!
Jane x

Wednesday 31 August 2016

August Tag...

I'm finally here with the August tag - it nearly didn't happen since my computer has been in intensive care being fixed - but all is well now and I can share the photos of the August Tag in Progress.
The theme here is very definitely 'sunflowers'! I loved the sunflowers on the August Children's Hour papers the minute I saw them and knew that I would have to do some fussy cutting!!
To make this tag you'll need the two Children's Hour papers for August, some thick string or rolled up paper, dark brown card, light brown or terracotta card, green ink and co-ordinating ribbon.

As usual I started with a 4"x8" tag - but this time I used dark brown card,
To make flower stalks I  coloured some paper strings with green distress stain and left them to dry...
Next I cut the girl with cat card from the August Collective paper and centred it on the card towards the top. I glued the stalks on and surrounded with foam pads.
Then I cut the terracotta coloured card to make pots and pot rims - starting with rectangles then cutting them down by eye into flowerpot shapes and inked the edges...


I stuck these to the bottom of my tag on the foam pads and covering the ends of the stalks...
Time to sit down with some good scissors, a film you enjoy and the August Montage paper and cut a load of sunflowers out...
I also cut out lots of the little blue flowers and leaves.
I added the sunflowers to the top of the stalks...

and glued the blue flowers and leaves to the top of the middle flowerpot...


Finally some co-ordinating ribbon through a punched hole in the top and the tag is done!

Saturday 30 July 2016

July Tag Time

For this month's tag we go to the beach - literally, since I added sand and shells
I found on the beach when I was on holiday on the Isle of Eriska!
To make this tag you will need the July collective and July Montage papers, a 4" x 8" tag, shells and sand, some co-ordinating ribbon, foam pads and pva glue.

Start by covering your tag with paper from the July Montage as shown...
From elsewhere on the July Montage paper cut out the children so that you can add them to the tag with foam pads to create a decoupage 3D effect...

Add a piece of driftwood to the bottom of the tag and start to attach shells using strong glue (like hot glue or glossy accents)...
Mix your sand with some pva glue until it is a thick paste then spread the glue-sand mixture over the bottom of the tag... I also cut out a couple of pictures of other children from the July collective papers and added them at this stage...


Finally cut out some of the poppies to add to the top of the tag and staple on some co-ordinating ribbon...
And you have a tag which is a lovely reminder of a day at the beach.
Happy crafting!
Jane x

Thursday 30 June 2016

A June Tag at last...

So for me today... school's out for summer which means I finally get a chance to blog about my June tag...just in time before July tomorrow!
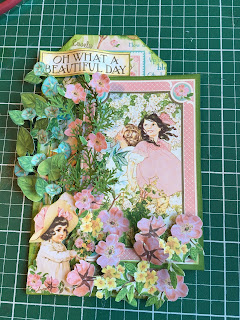
Here it is...
As usual you will need the two Graphic 45 Children's Hour papers for this month and a 4" x 8" tag made from any cardstock. You will also need: some florists' wire, green card, co-ordinating ribbons, a piece of thick card or chipboard and a leaf/frond punch.

Start by colouring the florist wire green - I used distress ink..,.
Set the wire aside to dry and begin covering your tag. I covered the whole tag with paper from the bottom left of the June montage paper - I drew round the tag then cut it out and stuck the paper on...


I then inked the edges of the tag and stuck a piece of thick card to the right hand side of the tag to raise up the panel I planned on sticking on (you could just use foam pads but I find this method quicker!)...

Next I cut the panel from the June Collective paper (cutting round the flowers) I stuck it on to green card to give a thin border and add strength... 
 I cut the border round the panel - I also cut the 'Oh what a beautiful day' sentiment and the little girl holding a bouquet (also from the Collective paper)...
 I added the panel and the sentiment to my tag...

Next I used hot glue to attach the green wires to the bottom left of my tag...

I then hid this by sticking the bouquet holding girl over it... I then watched some TV and cut out a load of flowers and leaves and punched some fronds using my Martha Stewart frond punch...

I stuck the flowers and leaves onto my tag - some to the wires with my hot glue gun (though glossy accents also works well for this) and some to the tag using foam pads...

Here are some close ups...


 I punched a hole and added my ribbons and the tag was done!


I hope you give this a go - It's my favourite tag so far.
Happy crafting and enjoy July!
Jane x

Sunday 29 May 2016

Let's play tag in May!


Hello again to those who are following this series of tag tutorials. For the May tag you will need the two May Children's Hour papers, a 4" x 8" tag, some white card, foam pads, co-ordinating ribbon, a piece of floral wire and a thin skewer or similar stick to wind the wire round.

As usual I started by looking at the papers and cutting out the images I wanted to use on the tag - it should be noted that I didn't end up using all the bits I'd cut out and did cut out more butterflies and the boy looking out of the window (with the window) later on! The pic of the woman with all the children is the larger version in the frame from the May Collective sheet.

Taking my inspiration from the boy looking out of the window I then cut out a white window frame, 11cm x 14cm with a 1.5cm thick frame...
I cut two strips 13cm x 2cm to make the window sill and trimmed them as shown in the photos below...


Now to start adding things to the tag. I cut out some of the pink paper (leaving the strip on because I knew the frame would cover it)...
I checked the frame would fit over the top...
I then added the brown spotted paper as though this was the house wall...
Then I added the frame (with inked edges now) using foam pads...
I then added another sill on top... more foam pads...

Next I started to stick the cut out people into my window...(notice the boy looking out of the window in the background!) Have a play around with the placement before you start gluing down!
Now to decorate outside the window. I added the groups of cut out flowers and the birds nest (and bird!)...
Then I added the quote at the bottom and I decided I needed to make my window look more frame-like so I added thin strips of card vertically and horizontally like bars on the window - it would have been easier to do this earlier!!...
Next I wanted to add the butterflies and make it look like they were flying - so I used a florist wire...
Wrapped round a skewer to give it a curl...

Then bent the end over to give more surface to glue the butterfly to...

I added my butterflies to the tag and added some ribbons...
And that was my tag finished.
June's tag is almost done and ready to go - so I'll be back soon!

Jane