Today is my newest recipe - plucked straight from the internet. I thought the picture on the blog where I saw them looked amazing, but what was even better was that when I followed the recipe, mine turned out looking exactly like the recipe - result! (This almost never happens!)
In fact you can find the recipe that I used here on the 'Domestic Femme' blog. I plan to make lots more with peppermint essence and choc-chips.
Tonight I'll be flying down to London - I'm looking forward to my weekend away and in particular to going to dinner on Saturday night at 'Dinner' (a Heston Blumenthal restaurant)... will see if I can get some pictures!
...and it actually did snow a bit today - though it was totally overshadowed by the high winds which shut the Forth Road Bridge at one point.
Today's recipe is for baked mini doughnuts (or donuts if you prefer!). I love these because they are so easy to make with no hot oil to worry about. I first made them for my class at school when we were learning about Hanukkah - as doughnuts are typical Hanukkah fare and I thought my class might like these as a treat.
You do need the right baking equipment though - I have a silicone mini doughnut tray which works brilliantly. I think the recipe was attached to the tray when I bought it...
you need...
1 cup plain flour
1/3 cup sugar
1 teaspoon baking powder
1/4 teaspoon salt
1 tablespoon melted butter
6 tablespoons milk
1 teaspoon vanilla essence
1 beaten egg
cinnamon sugar
1. Sift all the dry ingredients together in a large bowl.
2. In a separate bowl mix together the 'wet' ingredients then whisk into the dry ingredients.
3. Butter a mini doughnut tray then 1/2 fill each 'well'.
4. Bake for 5 - 10 minutes at 180degrees C until golden.
5. Remove from tray and roll in cinnamon sugar while still warm.
6. Eat immediately!!!!
Happy December 4th and it's a double whammy from me today because I also appear on the ATDML blog today - well my advent project does - as it is ATDMLs offering for the UKScrappers Christmas Blog Hop - you can find it here.
So today it's one of Jonathan's favourites - my festive sausage rolls - and they are so easy to make.
You need some puff pastry (I love the ready made and ready rolled sheets - so easy!); some sausage meat (I use really good sausages, like the Tesco Finest ones and take the skins off); you need a pack of stuffing mix (good old Paxo will do fine!); and finally some beaten egg.
Make up the stuffing mix and let it cool then lay out the pastry and put a line of sausage meat along the middle, flatten it out a bit and top it with a line of stuffing. Roll up the pastry then cut into smaller sausage rolls (or leave it big if you like!). Brush with beaten egg then bake for 25 minutes or until golden brown and puffed up.
Enjoy!
Day three on my Kitchen countdown is very simply... roasted chestnuts. It just would not be Christmas without them (though strictly speaking I don't need a recipe for these!!). I very simply prick each chestnut and then pop them in a hot oven for just a few minutes. If you don't prick them then you risk exploding chestnuts decorating the inside of your oven!
I remember my mum making these when I was little - and being allowed a sip of sherry along with them. I perhaps have a little more than a sip these days - but 'just the one'!
When I lived in Hong Kong, one happy memory was buying chestnuts from the street vendors, they were stirred with spades in giant woks containing rocks with sugar thrown in to give them a caramelised flavour. They were the most delicious chestnuts in the world!!
When we were in Rome in October this year it was wonderful to see the decorated vendors carts selling enormous roast chestnuts...not cheap at 5 euros a cone - but it didn't stop me buying them!
2nd December on my Kitchen Countdown is a picture and recipe for the most delicious hot chocolate which for me is an important ingredient in Christmas celebrations.
I make my hot chocolate with whole milk and Cadbury's Drinking Chocolate - stirred together and heated the old fashioned way in a pan is best - though I do often resort to the microwave! Add mini marshmallows, top with whipped cream and either a dusting of drinking chocolate or crumbled Flake. Sometimes a candy cane to stir the mixture instead of a spoon is the order of the day, giving a 'pepperminty' flavour to the hot chocolate. I have had all sorts of expensive hot chocolate concoctions - but for me this is still the best.
Watching a Christmas film with the fire on, candles lit and a big mug of creamy hot chocolate is my idea of Christmas heaven. So apart from stocking up on all the ingredients for hot chocolate I thought I'd better audit my Christmas DVD collection. Here are my top 10 Christmassy films... (I have a whole other list of favourite films - but these are specifically the Christmas themed ones)
1. Scrooged
2. Home Alone 1
3. The Grinch (with Jim Carrey - probably the only film I like him in!)
4. Elf - so bad, it's good!
5. The Polar Express - I have to have a hot chocolate with this one!
6. The Snowman/ The Snowman & Snowdog (makes me cry!)
7. The Muppets Christmas Carol
8. Miracle on 34th Street (the newer version with Attenborough)
9. Home Alone 2
10. It's a Wonderful Life or White Christmas (I'm undecided!!)
I'd love to hear about your favourite 'Christmas' films and your ideas for hot chocolate recipes.
Welcome December! This is such a busy time of the year for crafters - making cards, handmade gifts, decorations for the house - this alongside everything that everyone else is trying to do too - buying presents, getting our homes ready for Christmas, going to parties and Christmas events (and trying not to think about those resolutions looming in January!).
Last year I was totally not ready for Christmas - my cards never got posted and there was a lot of last minute panic! This year I resolved to be more prepared. To that end I have already made good headway into hampers packed full of homemade jams, shortbread and Christmas fayre and yesterday I finished my Christmas planner and completed a four stage Tesco online food ordering process. Store-cupboard staples arrive this week, frozen foods and larder items next week, then fresh foods/vegetables etc. the week after and then the turkey and other short shelf life fresh items such as fresh cream, milk, bread will hopefully arrive on 23rd December. It feels good to have all this in hand - although a little ridiculous since we live within walking distance of a 24hour Tescos which will only be closed on Christmas Day. However - I loathe visiting the supermarket at Christmas time - they are crazy places packed with stressed people all panic buying.
I love my new planner which I hope will be useful for many Christmasses to come - My goal is to share both my planner and my Christmas Kitchen Countdown here and to see how much I can blog about them both in December. Of course thanks to having to do a class for the ATDML retreat at the end of October, my Advent calendar is already made...
Christmas Planner
I made this with a wooden blank book I'd had in my stash for a while and a set of Simple Stories Christmas papers from 2011 which I loved and wanted to do something special with. I added extra pages made from Kraft cardstock. Here is the outside to whet your appetite...more to follow as Advent unfolds.
Christmas Kitchen Countdown
I actually made this about 4 years ago - but without any photos. I do a lot of cooking and baking over the Christmas period and to me food and drink are really important aspects of the season. Some things I make year after year and I am always trying to remember which cookbook or website the recipes come from - I decided that a calendar of sorts for the kitchen which featured the recipes I would be using would be a perfect addition to my Christmas kitchen. I made the calendar from an 8"x8" paper pack I was given as a gift - (I think it may have been DCWV - but I'm not sure). The numbers are cut on the Cricut and the whole thing is held together with book rings and is hanging on a 7 Gypsies book stand.
My plan is to share each page and each recipe with you - pre Christmas stress permitting. Since I am still recovering from a virus that has wiped me out for the past 3 or 4 weeks it may be a big ask! The first page is a picture of last year's Christmas gift cakes...sorry no recipe with this one, since by 1st December my Christmas cakes have long since been made and are currently being 'fed' with brandy before being decorated.
I would love to have your comments on any of the projects or recipes I post.
When my last DT kit from ATDML came through I was really pleased to see that it was some Graphic 45 and with the Steampunk Spells papers there were die cut mini bunting flags. Straight away it made me think of a fairground or gypsy caravan. I decided to make Madame Macabre's gypsy caravan. I used a piece of foamboard for the base of the caravan and 4 empty 'East of India' ribbon reels for the wheels which I attached on wooden dowel axles. The rest was constructed with thick black card and the Steampunk Spells papers (though the green paper on the front of the caravan is from last year's G45 Halloween collection). So without further ado, welcome to Madam Macabre's gypsy caravan, let her read your fortune in her tarot cards, or perhaps sell you a love potion...
This is the first in a series of articles and project ideas that I have been asked to write for the 'A trip down memory lane' blog...here.
I thought I would share it on my own blog too.
Anyone who knows me or has been in one of my classes probably knows that Graphic 45 is my favourite paper manufacturer; yet I am very aware that there are many people, who, while they like the papers, choose not to use them because they find them a bit daunting and just don’t know what to do with them.
When I look at images of Graphic 45 projects online I am constantly reminded that I am in no way an expert – there are some amazing paper-crafters out there using Graphic 45 to produce stunning work. I am just someone who loves Graphic 45 paper and I want to share my passion for the papers and try and inspire others to overcome their ‘fears’ and give it a go.
I would like to present to you a series of Graphic 45 articles with hints and tips for using Graphic 45 papers and products, spotlights on particular paper releases, skills that suit the Graphic 45 papers and project ideas to use with the latest Graphic 45 ranges.
One of the best sources of inspiration for using Graphic 45 papers is the Graphic 45 blog which can be found here. They have a very active blog with lots of sneak peeks of new products, giveaways, project tutorials and they also showcase the work of their designers. The projects on display are quite amazing and certainly inspire me to want to give things a go – though I could understand that to look at the designers’ work can be a little daunting and many beginner (or even intermediate) crafters might think ‘I’ll never be able to do that so why even try!’. Don’t lose heart – the projects you do with Graphic 45 don’t have to be all singing and dancing and in this vein my first article title is ‘conquer your fear’!
Conquer your fear
To start with, you need to get over your fear of Graphic 45 and just start to use it as you would any other papers. Ask yourself – what are you afraid of? Is it that you don’t want to cut into the paper in the first place? Are you worried that you won’t like your end result? Is it the cost of the paper? Well, I feel like that with lots of papers but actually Graphic 45 is no different so I say – just go for it!
My advice for this would be if you are nervous - avoid the ‘title’ papers. As beautiful as they are, they need a bit more thinking about so you’re better off with a selection of patterns from the collection. That way you don’t need to think as much about what you’re going to ‘do’ with them. Next team them with a plain cardstock and for your first foray into Graphic 45 try using the patterns sparingly – keep your layout simple. Lots of the layouts you will see on the Graphic 45 blog are very elaborate, but that’s because the designers are trying to showcase the papers, chipboard shapes, stickers etc. so they try to cram as much product on as they can (and undoubtedly, they do a beautiful job – but it can be a little hard to live up to). So try using a sketch, some plain cardstock and two or three patterned papers which work together. Either cut your title from cardstock or buy some Thickers.
The next thing to stop being afraid of is trying to make your layout or project fit the theme of the papers – you don’t have to have pictures of the circus to make a layout with Le Cirque papers or photos of antiques to be able to use Olde Curiosity Shoppe!
This is a great Le Cirque layout by Robin Shakoor taken from the Graphic 45 gallery:
And here is a lovely layout by designer Jane Tregenza using Olde Curiosity Shoppe papers:
Both of these pages use layering of papers and designs. I’m going to keep my first project for you even more simple using layering and punched designs.
To copy my design exactly you will need: (links should take you to the ATDML shop)
12”x12” Blue cardstock (not sure the exact blue I used as it was from my stash!)
A small amount of orange and black Cardstock
Bohemian Bazaar papers: a sheet each of Dazzling delights and Lap of Luxury and small amounts from Jasmine Nights, Vivid splendour, Opulent Sunset and Kaleidoscope
Coloured brads
Black ink
Punches: different sized circles and scalloped circles, butterfly, leaf
Below is my layout and a video to show you how I put it together…
If you don’t want to use Bohemian Bazaar then there is also a sketch for you to use with a different paper line – but do try to use Graphic 45 – after all, that’s the aim of these articles! But whatever you decide to do…happy crafting.
Ok - so I'm really getting the hang of this video thing and this time I decided I could tackle something a little more challenging. This project is reminiscent of the ABC Primer book project bound with coloured pencils that I did for one of the ATDML retreats. This time, my stab binding is done with chopsticks to fit the theme of the Birdsong papers.
I learned the hard way that you can't upload anything longer than 15 minutes to YouTube, so here is my video tutorial in two parts...
Part 1 is a 'how to' for the basic book and binding...
If you want to see more of my decorated book - check out part 2 of the tutorial...
One thing I forgot to say on the video is to give credit to Helen who showed me how to make the flowers a few years back when I first bought the Stampin' Up! scalloped circle punch. Thanks Helen!
I'm very excited - tonight I recorded my first ever video tutorial, edited it with Windows Movie Maker and uploaded it to my YouTube channel.
It had to be something very simple because I was thinking so much about the filming that I needed to know that I could do the project in my sleep. So I filmed a simple 'squash book' tutorial. I've made these loads of times with the children at school in Papercraft club so I knew it would be ok for a tutorial. The filming wasn't great - I used my I-phone balanced on top of a lamp and, because I can't see what the camera is seeing, a few times my project disappears out of shot. Oh well, I'm sure I'll get better with practise!
Anyway - I hope you like it...
When I was shopping this morning I picked up a copy of Cards and Papercraft magazine - I'll be honest, it was a bit of an impulse buy because I liked the look of the freebie papers that came with it...
I had also bought some great little envelopes when I was at a paper shop down in Washington - so with the addition of 5 sheets of red card and some woodgrain embossed cream card I made a set of 20 little cards. I have left off the sentiments for now so that when I need a card I can just add the appropriate sentiment with a stamp, stickers or some rub-ons, In the paper pack there were 10 sheets of paper (2 of each design) and 4 sheets of die cuts. I managed to make 2 of each design of card.
Here they are...
And each one, close up...
I'm really pleased with my set of cards - it was a very enjoyable afternoon of crafting.
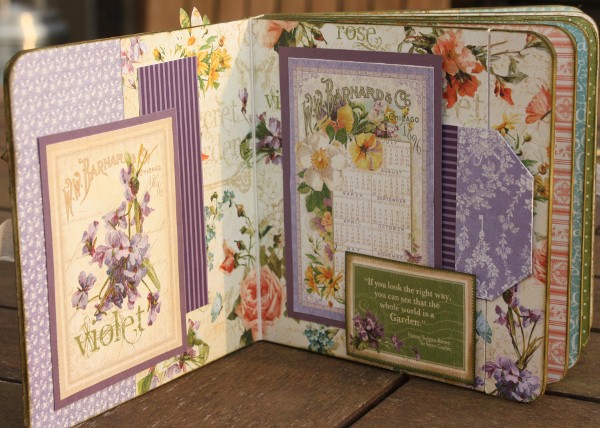
Welcome to my final Secret Garden post (at least for now as I think I have run out of Secret Garden papers!!)
As promised, here is a look inside the altered Urban Lily Secret keeper book that was lurking inside my altered box.
The next picture shows how the page above to the right pulls out to reveal a secret page which can be used for journalling or photos...
And finally the back of the book...
I hope you have enjoyed looking at my Secret Garden work. If I can manage to do it I will record a You Tube video showing all of the projects.
Hopefully I will soon be able to show you my Graphic 45 vintage television i-pad stand - all of the woodwork part is done - just decoration to go! Tune in again soon!
Thanks for looking!